
When I was little, we had a toy chest in our playroom closet. It was brown, sometimes smelled a little musty and filled with several board games. We loved it and it’s one of the pieces I remember most in our playroom. I recently found out it was my YiaYia’s back in the day which makes it even more special.
Lucky for me, my parents kept it after all these years and asked if I wanted it for Peyton’s toys. I jumped on their offer and immediately started dreaming of the ways I could refurbish it. My initial thought was to strip and re-stain the tops and the sides, giving it a rustic look. Unfortunately, during the stripping process I found that the piece wasn’t stained very well and some of it was so deep, it stuck to the wood.
I was frustrated, but became open to the possibility of adding color to the chest, especially because I wanted it to be fun and something she’d always remember. Here’s what I used:
- Valspar chalk paint – in yards of tulle
- Valspar sealing wax
- Chalkboard paint
- Matte Mod Podge
- A couple of big brushes
- Roll of world map paper from Hobby Lobby (can be found in the scrapbook paper aisle)


Below are the steps I took to create the end product (I apologize, I don’t have any photos of what the chest looked like before, or the steps I took to refurbish it. I lost them when transferring files from my old computer):
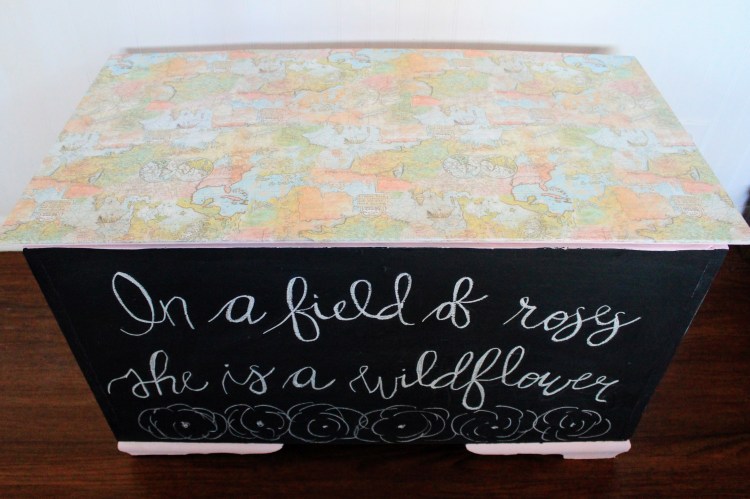
I painted the inside and most of the outside with three coats of blush chalk paint, and finished it by coating it with a sealing wax.
Next, I painted the front of the chest with two coats of chalkboard paint. I wanted the toy chest to be interactive and loved the idea of being able to write quotes on it, or having our daughter draw on it herself.
Finally, I bought a big roll of world map paper at Hobby Lobby to place on the top of the chest. The paper didn’t fit the dimensions of the top, so I had to measure and cut two pieces to evenly fit them on top of the piece.
I generously painted some matte Mod Podge on the top and placed each sheet of paper on the chest, pressing it down firming and cutting the extra paper off the sides with scissors. I covered the paper with more Mod Podge to ensure it would stick to the chest and waited for it to dry.
I love having this chest in her playroom – it adds color, fun and helps organize the millions and millions of toys she has. If you end up finding inspiration from this post, don’t forget to tag #marinamakesdiy.


I love this project. I am trying to use chalk paint for the first time next week. This was a very special project for you. I love the saying on the front too!
LikeLike